To undo the slip knot simply remove your crochet hook from the loop and pull the yarn end away from the slip knot. Bring the working yarn underneath the circle.
How To Make Crochet Slip Knot Coloring Pages - If you're searching for video and picture information related to the key word you have come to visit the ideal site. Our site gives you hints for viewing the highest quality video and picture content, hunt and find more enlightening video articles and graphics that match your interests. includes one of tens of thousands of movie collections from several sources, particularly Youtube, therefore we recommend this video for you to view. It is also possible to bring about supporting this site by sharing videos and images that you enjoy on this site on your social media accounts like Facebook and Instagram or educate your closest friends share your experiences concerning the ease of access to downloads and the information that you get on this website. This site is for them to stop by this site.

How To Make A Slip Knot For Crochet Yarnspirations
Pull both yarn strands to tighten the slip knot.

How to make crochet slip knot coloring pages. DO NOT re-publish my photos as your own. With your thumb and index finger facing you like pinchers insert from the back side of the loop. Notes on your slip knot.
Tighten the slip knot by pulling the loop. Thanks to New Stitch a Day. Learn how to crochet a slip knot.
With the tail of the yarn to your left and the working yarn to your right form a loop over your index finger. Wrap the working end of the yarn around your fingers to make a circle. Try Here Or for a photographic guide.
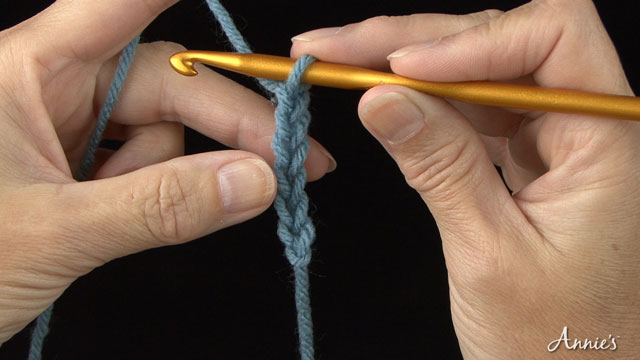
This tutorial will show you how to create a slip knot which is the beginning step of most crochet patterns. How to make a Slip Knot. You now have a loose slip knot on your crochet hook.
Dont make it too tight because you want to get your hook in and under it when you begin your crochet. These are most definitely not the only ways to create a slip knot but its a start. How To Make A Crochet Slip Knot For Beginners.
Even More How To Make A Slip Knot Videos Here and also Here and even Here. This is where I will begin from in my next photo tutorial. After you master this technique be sure to check out my crochet classroom for even more stitch tutorials.
See all Crochet Video Tutorials. Here I have shared a photo of the slip knot on a knitting needle. Again be careful to not pull too tight.
Slip the loop onto your hook and with the yarn thats leading to the ball pull and tighten. There are several different ways that you can make a slip knot and Ive chosen two of the easiest ways I could find and explain. This way you will know how to crochet slip knot starting today.
Insert hook into the loop. Slip Knot How to Crochet Photo Video Tutorial. Now that you have figured out how to create a slip knot you are more than welcome to read my tutorials on Chains and Single Crochets.
If youre more of a diagram person. Your first slip knot is finished and now you can begin your crochet project. Pinch the tail end and pull the working yarn to fit snuggly around the crochet hook.
Learning how to tie a slip knot in crochet is one of the most important things to master. Pull on the yarn tail to tighten the knot. Grab one of the strands of yarn with each hand and pull out moving the slip knot up to the hook.
Insert your hook through the first loop of the pretzel. Place your crochet hook inside of the loop youve just made. Take the tail end of yarn and loop it over the working end of yarn.
Leave the knot on the crochet hook and pull gently on both ends of yarn to tighten it. And thats how you make a slip knot in crochet. Making a slip knot is likely the first step in most crochet.
Pull the loop through the pretzel making your crochet slip knot. Transfer the loop created by tightening the knot to the hook if its not already there. There are a few methods in crochet to form a slip knot.
I will highlight two ways to make a slip knot with video tutorials below. Rotate your wrist so that the yarn between your hands. This post includes a step by step photo tutorial for how to make a slip knot.
Pull and fold the tail end of the yarn toward the back of the loop making a pretzel shape. Because a slip knot is used to begin nearly every project. Please note not all patterns will mention this step however ALL crochet require you start with a slip knot.
Pull on the working yarn to tighten the loop around the hook. Patterns to build your skills. Insert your crochet hook or knitting needle into the loop that was left on your finger and pull the tail end to tighten around your tool and now you are ready to begin working.
Knitting and Crochet Video Tutorials for this article inspiration and featured image. To make a slip knot. Then twist your fingers clockwise to make the yarn cross over itself and form a loop.
Hold tail of yarn with one hand and pull the yarn with another hand at the same time. To straighten place both ends in one of your hands and pull a bit putting the knot in place. Be careful not to over-tighten it as the crochet hook should move easily inside this loop.
Hold yarn with your ring finger of the hand which is holding tail of yarn. It should be snug but not excessively tight. Put 2 fingers inside the.
Plus a video tutorial demonstrating the slip knot. Pinch the working end of the yarn through the middle of the circle. To make a slip knot for knitting or crocheting pinch the yarn 6-8 inches from the end.
Step Four You should have a slip knot around your crochet hook with two strands of yarn underneath. If you enjoyed this article please share and Like our Facebook page.

How To Crochet Crochet Stitches Guide Slip Knot Crochet Beginning Crochet
Pin On Sigonimacaroni Com Beginner Crochet Tutorials Free Crochet Patterns

How To Make A Slip Knot For Crochet Yarnspirations

How To Make A Slip Knot For Crochet Yarnspirations
Chain Stitch

How To Crochet A Slip Knot Step By Step Instructions More Knitting Crochet A Slip Knot Crochet Easy Beginner Crochet Patterns Crochet Stitches For Beginners

Slipknot Knit Crochet Embroidery Stitches Tutorial Knitting

Pin On Knit Crochet Fun

Pin On Teaching Crochet
